ComfyJ Programmer's Guide
Version: 2.13
Last Updated: November 10, 2015
Copyright © 2002-2021 TeamDev Ltd. Chapter 1. Introduction
ComfyJ is a product for Java-to-COM and COM-to-Java
integration. Java-to-COM integration allows a
Java application to easily integrate with any COM/OLE/OCX/ActiveX
libraries in pure Java without writing any native code. The following
features are available in this version of ComfyJ: Wrappers for all standard COM interfaces, such as
IUnknown,
IDispatch, etc. Support for standard COM types, such as Variant,
SafeArray (single and multi-dimensional arrays),
BStr, etc. Support for VTBL method calling mechanism. You can invoke COM
object methods by using function index. Automation support enabling you to: Invoke any method of a COM object by using a dynamic method
invocation technique. Get any property of the COM object, including indexed and
named ones. Set COM object properties.
Support for COM events. You have the ability to create a Java
COM event handler and connect it to a COM object using a standard
(findConnectionPoint/advise) COM technique. Embedding any OLE/OCX/ActiveX controls into a Swing application.
ComfyJ provides a special OleContainer class
allowing you to: Create an embedded object using ProgID, CLSID, or from a
file. Also, there is a way to insert an IOleObject into the
container. Embed various OLE/OCX/ActiveX components, such as Internet
Explorer, Acrobat Reader, Microsoft Office documents, and various
media components such as Windows MediaPlayer, DVD player,
QuickTime, ShockwaveFlash, etc. Perform static drawing of an embedded component. Save/Load an embedded OLE Object to/from a file in a special
binary format. Do various kinds of in-place activation such as SHOW,
INPLACEACTIVE, etc.
DCOM support. ComfyJ allows creating COM objects on a remote
server. Support for different threading models. CodeGenerator application. This specially designed application
allows you to generate Java COM wrappers for custom COM objects.
Generated classes can be compiled and packed to a JAR file, if
necessary.
COM-to-Java integration allows you
to implement and expose Java COM objects as usual COM objects in pure Java
without writing any native code. In this version of ComfyJ you can use the
following features: IUnknownServer - The server
implementation of the IUnknown COM
interface. All custom Java COM objects that implement the
IUnknown COM interface can be derived
from this class. DispatchServer - The server
implementation of the IDispatch COM
interface. All custom Java COM objects that implement the
IDispatch COM interface can be derived
from this class. Ability to create and register custom Java COM classes at run
time. This technique is widely used in the implementation of
OleContainer (see item 6 on the list above) and in COM
events support (see item 5 on the
list above). ServerManager application. This application allows you to create
any custom COM classes and register them as COM servers in the system
registry.
1.1. PrerequisitesComfyJ is based on JNIWrapper and WinPack products developed
by TeamDev. Therefore, to start effectively using ComfyJ, you need to
have basic knowledge of JNIWrapper and WinPack API. You can find the
documentation on these products online. We recommend you to start with
JNIWrapper Programmer's
Guide. To get the full package of JNIWrapper and WinPack, including
samples' source code, please download the full JNIWrapper
distribution. 1.2. Related DocumentsThe documents provided on the Documentation page at the JNIWrapper
area (http://www.teamdev.com/jnjwrapper)
at TeamDev site are intended to help you in understanding and effective
use of ComfyJ. We suggest that you read the ComfyJ documentation in the
following order: You can start with this Programmer's
Guide that describes the basics and underlying ideas of
ComfyJ. To get some hands-on experience in using ComfyJ, you can
proceed from this Programmer's Guide to
ComfyJ Tutorial You can also find helpful information in Frequently
Asked Questions that we regularly update based on the
questions we get from our users. You can access them online at the
JNIWrapper site.
Chapter 2. Getting Started
2.1. ComfyJ Distribution OverviewThe ComfyJ distribution includes: ComfyJ library. This library
provides Java and COM integration functionality. JNIWrapper library. This is
the core library of Java-to-Native integration for Windows. WinPack library. This is the
library for Windows Desktop integration. Code Generator application.
This application allows you to generate Java wrappers for interfaces
and coclasses of the specified component, type library or
module. Java COM ServerManager. The
application is designed for registering and removing COM servers
written in Java using ComfyJ.
2.2. System RequirementsThe following are the general requirements for running ComfyJ on
the supported platforms: OS: Windows 9x, Me, NT 4.0, 2000, XP and 2003. Java: Java 2 SDK/JRE 1.3.x and higher. For Code Generator
GUI mode, the preferred JDK is 1.4.2 or higher.
There are no specific memory or other hardware requirements for
developing an application based on ComfyJ. 2.3. Package ContentsThe ComfyJ package consists of the following main files required
for work: Library JAR file -
comfyj-<version>.jar, where
<version> is the product version, for
example "2.0". JNIWrapper library -
jniwrap-<version>.jar, where
<version> is the product version. WinPack library -
winpack-<version>.jar, where
<version> is the product version. Native code library License files
The Code Generator application has the following related
libraries: Code Generator application -
comfyj-generator-<version>.jar, where
<version> is the product version. Velocity library - velocity-dep-1.3.1.jar
is used for creating template-based Java wrappers. Commons library - commons-cli-1.0.jar is
used for parsing command-line parameters.
The Java COM ServerManager application is based on the
following: Note that all the files need to be placed in the appropriate
locations. For more details about the product installation instructions,
see the section "Configuring
Software". The package may also contain other files providing some useful
information for the user, for example the Readme.txt
file. Chapter 3. Configuring ComfyJ
As mentioned earlier, ComfyJ consists of six main files required for
the software functioning: JAR files, native code library, and license
files. The following sections describe where each file should be located.
No other configuration is required. 3.1. Library JAR FilesThe ComfyJ, JNIWrapper and WinPack JAR files should be located in
the program classpath. Due to the limitations of the Java native library
loading mechanism, it is not recommended to load ComfyJ in custom class
loaders unless you are sure that it will be loaded in only one such
class loader. The library files can also be placed on the boot class path or in
the extension directory of Java runtime, but this is not
required. 3.2. Native Code LibraryThe JNIWrapper native code library is loaded using the standard
Java native code loading mechanism. There are no known problems with
placing the native code library file on a mapped drive or even using it
from the network share using a UNC path.  | Do not rename the library file, or else it will not be
loaded. |
Even though the native code library can be placed
virtually anywhere, its actual location should be specified considering
the fact that Java code should find the library to load. It can be
placed somewhere within the program library search path (value of the
java.library.path system property, which is by
default equal to the value of the system variable PATH on
Windows). Alternatively, you can add a search path to the default library
loader used by JNIWrapper or even write a custom one that searches for
native code in a predefined location. Using the default path may be
preferable for development and the library loader as a much better way
for distributing a complete application. The jniwrap.dll can be placed in any JAR
library from the application classpath, but not in the
META-INF subfolder. You may want to install the native code library into the
directories on the default system path, for example the root of Windows
installation or Windows\System32. Note that this requires having
appropriate access rights to the Windows NT/2000/XP system. Installing
the native code library using this way may be convenient, but is not a
required procedure. 3.3. License FilesPlacing the license files is very simple: They need to be located
in the same directory as the native code library file. | Do not rename the license files, or else they will not be
recognized. |
Alternatively, the license files can be placed in the
META-INF folder of any JAR library from the
application classpath. Chapter 4. Using COM Integration
The functionality of ComfyJ COM integration is based on run-time
classes that come in the core library and code generated for specific COM
objects of your application. Although it is possible to work with COM/OLE objects via COM/OLE
Automation (see the section "Using
COM/OLE Automation" ), which does not require generating code, for
complex integration tasks it is much more convenient to work with API
generated for COM functionality by Code Generator (see the section "Code Generator Application"). 4.1. COM Support Initialization and ShutdownEach Java thread that invokes COM functions and works with COM
classes should initialize a COM library at the beginning of its
lifecycle and uninitialize it at the end. 4.1.1. COM Memory Management in JNIWrapperAll COM resources as well as other native resources that are
allocated by JNIWrapper are garbage-collected automatically by
JNIWrapper's NativeResourceCollector (NRC). NRC starts automatically
on the application startup and runs permanently while the application
runs. There is no need to call the addRef()
and release() methods. The
addRef() method is called when an object is
created and the release() method is called
automatically when the instance is not used any more by NRC. Also,
when an instance of some COM class is created, it is automatically
registered in NRC. Alternatively, there is an ability to control the process of
instance deallocation by setting its AutoDelete
property to false using the
setAutoDelete(false) method. The example
below demonstrates how to do this: IUnknownImpl object = getObject();
object.setAutoDelete(false);
try {
// do something with the object here
} finally {
object.release();
} 4.1.2. Initializing COMThe initialization should be called at least once for each
thread that uses the COM classes or functions. You can do this by
invoking one of the following methods: ComFunctions.coInitialize()-
initializes the COM library in the current thread and identifies
the concurrency model as a single-threaded apartment (STA). It
corresponds to the CoInitialize native
function. OleFunctions.oleInitialize() - is
similar to coInitialize() and corresponds
to the OleInilialize native
function. ComFunctions.coInitializeEx(CoInit value)
- initializes the COM library in the current thread
with the passed concurrency model.
4.1.2.1. Concurrency ModelsTo specify a concurrency model different from single-threaded
apartment, use the coInitializeEx() method
that takes a specified concurrency model as a parameter. There are four concurrency models available from the
CoInit enumeration that can be used for
initialization: MULTITHREADED APARTMENTTHREADED DISABLE_OLE1DDE SPEED_OVER_MEMORY.
Most of the COM/ActiveX objects use the
APARTMENTTHREADED model. You can read about the concurrency model requirements in the
documentation of your COM object, or check the value of the
ThreadingModel key in the Windows Registry
corresponding to your class. 4.1.3. Performing Clean-upThe COM support should be uninitialized when the application
shuts down. To uninitialize the COM integration,
OleFunctions.oleUninitialize() should be
called if initialization was performed by
oleInitialize(); otherwise
ComFunctions.coUninitialize() should be
used. Both these methods do the following: Close the COM library in the current thread. Free allocated resources. Release any class factories or services.
4.2. Using COM in Multi-Threaded ApplicationsAs said earlier, COM objects can be accessed only from the thread
that initialized COM integration. In multi-threaded applications, it may
be necessary to work with COM objects from multiple threads. This can be
achieved by having a single thread for invoking COM methods so that
other Java threads post actions for execution. JNIWrapper provides the
OleMessageLoop class for this purpose. 4.2.1. OleMessageLoop ClassThe
com.jniwrapper.win32.automation.OleMessageLoop
class provides implementation for the COM dispatch thread and methods
for starting and stopping the loop thread, and invoking COM functions
in this thread. 4.2.2. Invoking COM Methods Without Return ValuesIf a COM function you intend to invoke does not return results
or you are not interested in returning these results to the calling
thread, you can add the
Runnable action to the
execution queue of the OleMessageLoop
class. ...
Runnable action = new Runnable() {
public void run()
{
// working with COM here
}
};
OleMessageLoop.addAction(action);
... The calling thread will continue its execution after the
addAction() call. The action will be run
after all actions already set in the queue are executed. 4.2.3. Invoking COM Methods with Return ValuesReturning values to the calling thread is a bit more
complicated. To do this, the following steps should be
performed: A method that deals with a COM object should be implemented
in the class that requests the execution from
OleMessageLoop. Later, this method will
be invoked in the COM thread using reflection. Request invocation of the wrapper method (created during the
previous step) by calling the
OleMessageLoop.invoke() method with the
following parameters: Caller instance Function name Function parameters
After the function call is requested, the calling thread will
wait until the function returns the result. The following example
demonstrates this invocation technique: public class Test
{
private _PropertyReaderImpl _pr = null;
public Test()
{
_pr = (_PropertyReaderImpl)OleMessageLoop.invokeMethod(
this, // caller
"createPropertyReaderClass", // function name
new Object[]{ // parameters
new ClsCtx(ClsCtx.CLSCTX_INPROC_SERVER)});
}
public Object createPropertyReaderClass(ClsCtx dwClsContext)
{
final _PropertyReaderImpl prClass = PropertyReader.create(
dwClsContext);
return prClass;
}
} 4.2.4. Displaying ErrorsBy following the rules mentioned in the previous sections, you
should achieve stable COM integration in your application. Generally,
if code appears to be non-working,
ComException is thrown with the error
code 0x800401f0: com.jniwrapper.win32.com.ComException: COM object method returns error code: -->
--> Unknown code(0x800401f0) If you get such an exception, please verify that your code is
written according to the COM integration guidelines described in this
document. 4.2.5. Creating New OLE Message Loop ThreadThe OleMessageLoop class can be used as a
singleton or as an ordinary class. Every instance of
OleMessageLoop reflects to its own
thread. OleMessageLoop has a static
getInstance() method that allows you to
access a single OleMessageLoop instance. There are three public constructors for creating
OleMessageLoop instances. When an
OleMessageLoop instance is created, the message
loop thread is not started yet. It should be started manually by
calling the OleMessageLoop.doStart()
method. A message loop thread can be a daemon (by default) or not. Use
the OleMessageLoop(boolean) constructor to
specify whether the thread is a daemon: //Creating a daemon message loop thread
OleMessageLoop oleMessageLoop = new OleMessageLoop(true);
//Starting the thread
oleMessageLoop.doStart(); 4.2.6. Invoking Functions SynchronouslyUse OleMessageLoop.doInvokeAndWait()
(or static OleMessageLoop.invokeAndWait() for
a singleton) to execute code in the message loop thread
synchronously: Runnable runnable = new Runnable()
{
public void run()
{
_Workbook workbook = new _WorkbookImpl(oleContainer.getOleObject());
String name = workbook.getName().getValue();
System.out.println("Workbook name = " + name);
}
};
try
{
oleMessageLoop.doInvokeAndWait(runnable);
}
catch (InterruptedException e)
{
e.printStackTrace();
}
catch (InvocationTargetException e)
{
e.printStackTrace();
}Any exceptions that are thrown in executing code are wrapped
into the InvocationTargetException class. Call
the InvocationTargetException.getCause()
method to get the original exception. 4.2.7. Invoking Functions AsynchronouslyUse OleMessageLoop.doInvokeLater() (or
static OleMessageLoop.invokeLater() for a
singleton) to execute code in the message loop thread
asynchronously: Runnable runnable = new Runnable()
{
public void run()
{
OleContainer oleContainer = new OleContainer();
oleContainer.createObject("Excel.Sheet");
_Workbook workbook = new _WorkbookImpl(oleContainer.getOleObject());
String name = workbook.getName().getValue();
System.out.println("Workbook name = " + name);
}
};
oleMessageLoop.doInvokeLater(runnable); 4.2.8. Binding Objects to OLE Message Loop ThreadOleMessageLoop provides the ability to
invoke all methods of an object in the OLE message loop thread using
the binding operation: //Creating a new _Workbook instance in the OLE message loop thread
Runnable runnable = new Runnable()
{
public void run()
{
workbook = new _WorkbookImpl(oleContainer.getOleObject());
}
};
try
{
oleMessageLoop.doInvokeAndWait(runnable);
}
catch (InterruptedException e)
{
e.printStackTrace();
}
catch (InvocationTargetException e)
{
e.printStackTrace();
}
//Binding the workbook object
workbook = (_Workbook) oleMessageLoop.bindObject(workbook);
//Invoking a workbook function in the OLE message loop thread
String name = workbook.getName().getValue();If the method of a bound object returns an object, the returned
object is not bound to the OLE message loop thread: //Binding the workbook object
workbook = (_Workbook) oleMessageLoop.bindObject(workbook);
//Invoking a workbook function in the OLE message loop thread.
//The sheets object is not bound
Sheets sheets = workbook.getSheets();
//Binding the sheets objects
sheets = (Sheets) oleMessageLoop.bindObject(sheets); 4.3. Exposing COM to JavaTo implement a Java COM class, the following steps should be
performed. 4.3.1. Creating Server ImplementationCreate a Java class that extends the
IUnknownServer class and implements required
COM interfaces as shown in the example below: // COM class implementation
public static class OleClientSiteImpl extends IUnknownServer
implements IOleClientSite,
IOleInPlaceSite,
IOleDocumentSite,
IOleWindow,
IOleInPlaceFrame
{
...
}If your server-side implementation of a COM object needs to
provide automation functionality via the
IDispatch interface, you can derive
your class from IDispatchServer that provides
default implementation. 4.3.2. Creating Class FactoryCreate a class factory server for a given COM class
implementation: // Creating a class factory server for our COM class
IClassFactoryServer oleClientSiteClass =
new IClassFactoryServer(OleClientSiteImpl.class); IClassFactoryServer will automatically
register the interfaces that are implemented by the specified class
and its parents. If the class
(OleClientSiteImpl in the example above)
extends IDispatchServer, the default interface
will be automatically set to IDispatch;
otherwise the default interface will be set to
IUnknown. If you need to specify a custom default interface, call the
IClassFactoryServer.setDefaultInterface()
method: // register a default interface for our COM class
oleClientSiteClass.setDefaultInterface(IOleClientSite.class); And finally, retrieve a class factory from the class factory
server instance: IClassFactoryImpl classFactory =
oleClientSiteClass.createIClassFactory(); 4.3.3. Creating InstancesNow that you have the instance of the class factory, you can use
it to create an instance of your COM class using the following
example: IOleClientSiteImpl oleClientSite = new IOleClientSiteImpl();
classFactory.createInstance(null, oleClientSite.getIID(), oleClientSite); The null parameter above means that the
object is not created as part of an aggregate. Pass a valid
IUnknown instance instead of
null if you work with aggregates. 4.4. Using COM/OLE AutomationIn some cases, it is necessary to invoke COM class functions or
set and get properties having only the IUnknown
instance and knowing the function name and its parameters or just a
property name and its type: For example, if a COM class was instantiated
by GUID. For these cases, ComfyJ provides the ability to invoke
functions via the IDispatch interface.
This technique is called Automation and is handled
in ComfyJ by the
com.jniwrapper.win32.automation.Automation
class. 4.4.1. Automation ClassYou can invoke a method of a dispatchable object using the
invoke() method of the
com.jniwrapper.win32. automation.Automation
class. Setting and getting properties is done using the
setProperty() and
getProperty() methods, respectively. All calls to this "automated" class are performed in its OLE
message loop thread. The following example demonstrates this. // retrieve the dispatched interface
IUnknownImpl dispatchable = getDispatchable();
String fileName = getFileName();
// create an Automation for instance
Automation automation = new Automation(dispatchable);
// set the COM object property using automation
automation.setProperty("FileName", fileName);
// invoke the COM object method using automation
automation.invoke("LoadFile", new Object[] {fileName}); 4.5. Using OCX Components Without GUIYou can work with OCX components without embedding them into
OleContainer. The following code sample shows how to do it. IUnknown ocxComponentWrapper = ...;
IOleObjectImpl oleObject = new IOleObjectImpl(ocxComponentWrapper);
// Initialize storage
ILockBytesImpl lockBytes = (ILockBytesImpl)
StorageFunctions.createILockBytesOnHGlobal(new GlobalMemoryBlock(), true);
IStorage storage = StorageFunctions.stgCreateDocfileOnILockBytes(lockBytes,
new StgMode(StgMode.STGM_READWRITE |
StgMode.STGM_SHARE_EXCLUSIVE | StgMode.STGM_CREATE),
new Int32());
// Initialize persist storage
IPersistStorageImpl persistStorage = new IPersistStorageImpl();
oleObject.queryInterface(persistStorage.getIID(), persistStorage);
persistStorage.initNew(storage); 4.6. Embedding ActiveX/OLE Components into Swing ApplicationsComfyJ provides custom client-side implementation of the OLE
container that allows embedding ActiveX/OLE controls into Swing
applications. ComfyJ provides its own implementation of the OLE container. There
is a special
com.jniwrapper.win32.automation.OleContainer
class that represents a usual AWT component and is designed to embed
various OLE/ActiveX components into Java Swing/AWT applications. OleContainer acts as a host site for OLE
objects. It can create an OLE object by ProgID, CLSID, or from a file.
Also, it provides the ability to insert an externally initialized OLE
object into the container. The communication with a created OLE object
is handled using the default OLE verbs. 4.6.1. Displaying Java Menus over ActiveX ComponentIn many cases, it is necessary to display Java menus over an
ActiveX component embedded into OleContainer. However, by default all
Java menus are "lightweight" and cannot be displayed over the
"heavyweight" ActiveX components. To solve this problem, just add the
following piece of code to your program: JPopupMenu.setDefaultLightWeightPopupEnabled(false); 4.7. Registering Callbacks for Generated COM
Components (COM Events Handling)This section describes the way of implementing custom event
handlers for ActiveX components. In many cases, it appears necessary to
be notified about events in a COM component and to handle them somehow.
Normally, for this purpose, COM components provide so-called connection
points. Connection points allow attaching custom event handlers by using
their advise() and
unadvise() methods. Such event handlers are
usually defined as dispatch interfaces in the type library. You can see how to do this using ComfyJ and generated stubs for a
COM component in the samples below. They demonstrate how to attach a
custom event handler (implementing the
DWebBrowserEvents2 dispinterface) to the
WebBrowser ActiveX component embedded in
OleContainer. Note that in order to execute the samples, you need to generate
Java stubs for the WebBrowser component using the
Code Generator application. Among the generated files, you will find
three files that correspond to the
DWebBrowserEvents2 dispinterface, namely
DWebBrowserEvents2,
DWebBrowserEvents2Impl, and
DWebBrowserEvents2Server classes. As mentioned earlier, DWebBrowserEvents2 is
a Java interface, DWebBrowserEvents2Impl is the
default implementation of the DWebBrowserEvents2
interface, and DWebBrowserEvents2Server is a
server adapter for that interface. The technique of advising custom event handler is quite
simple: // Create IConnectionPointContainer to ActiveX object
//that is embedded in OleContainer
IConnectionPointContainer connectionPointContainer =
new IConnectionPointContainerImpl(container.getOleObject());
// Find a necessary connection point
IConnectionPoint connectionPoint =
connectionPointContainer.findConnectionPoint(new IID(
DWebBrowserEvents2.INTERFACE_IDENTIFIER));
// Advise our handler
connectionPoint.advise(handler);The handler itself is an instance of the
DWebBrowserEvents2Handler class and is created as
shown below: public class DWebBrowserEvents2Handler extends DWebBrowserEvents2Server {
public static final String PROPERTY_STATUS = "status";
public static final String PROPERTY_PROGRESS = "progress";
private final PropertyChangeSupport _propertyChangeSupport =
new PropertyChangeSupport(this);
public DWebBrowserEvents2Handler(CoClassMetaInfo info) {
super(info);
}
public void statusTextChange(BStr /*[in]*/ Text) {
_propertyChangeSupport.firePropertyChange(PROPERTY_STATUS,
"", Text.getValue());
}
public void progressChange(Int32 /*[in]*/ Progress, Int32 /*[in]*/ ProgressMax)
{
_propertyChangeSupport.firePropertyChange(PROPERTY_PROGRESS,
ProgressMax,
Progress);
}
public void addPropertyChangeListener(PropertyChangeListener listener) {
_propertyChangeSupport.addPropertyChangeListener(listener);
}
}As you can see, the
DWebBrowserEvents2Handler class handles only two
events - statusTextChange and
progressChange - and notifies the
registered Java property change listeners. But any other events can also
be handled in the same way by overriding the appropriate methods of the
DWebBrowserEvents2Server class. Also take notice that if you wish to have an inner event handler
class, you shall make it static. For example,
if you declare the DWebBrowserEvents2Handler
class inside any other class, you shall declare it as public
static class DWebBrowserEvents2Handler. Since DWebBrowserEvents2Handler is a Java
COM class, it should be created using
ClassFactory. The technique and principles of
creating Java COM objects are described in the above sections. You should bear in mind, however, that
DWebBrowserEvents2 is not a dual dispatch
interface because it does not have a corresponding VTBL. Its methods are
invoked only using the IDispacth.invoke()
method by predefined dispIDs for each method of
the dispinterface. Therefore, we will use the following technique for creating a
handler: // Create a class factory server for DWebBrowserEvents2Handler
IClassFactoryServer server =
new IClassFactoryServer(DWebBrowserEvents2Handler.class);
IClassFactory factory = server.createIClassFactory();
// Create an instance of DWebBrowserEvents2Handler with a class factory
IDispatchImpl handler = new IDispatchImpl();
factory.createInstance(null, handler.getIID(), handler);
// Get the new instance of Java COM object from the server
DWebBrowserEvents2Handler webBrowserEvents2Handler =
(DWebBrowserEvents2Handler)server.getInstances().pop();
// Add a property change listener to monitor property changing
webBrowserEvents2Handler.addPropertyChangeListener(new PropertyChangeListener()
{
public void propertyChange(PropertyChangeEvent evt)
{
//your handling goes here
}
}Using this technique, you can create your custom event handlers
virtually for any COM component. In some cases, it is necessary to register an event handler
interface and the IDispatch interface in the instance of
IClassFactoryServer, like shown below: server.registerInterface(IDispatch.class, new IDispatchVTBL(server));
server.registerInterface(DWebBrowserEvents2.class, new IDispatchVTBL(server)); Such additional registration is necessary because some
ConnectionPoint implementations do not accept a
handler that implements the IDispatch interface
only and throws the CONNECT_E_ADVISELIMIT COM
exception. Chapter 5. Code Generator for ComfyJ
5.1. Running Code GeneratorAs the name of the Code Generator application suggests, its
purpose is to generate Java code for COM, OLE and ActiveX objects. You
can start the program by running
CodegenForComfyJ.bat from the
bin folder of ComfyJ installation. CodegenForComfyJ.bat takes the following
parameters: GUID of the type library or
ProgID of one of the components that belongs
to the library. Version of the library. Destination folder for generated sources. Root package name for Java source code to be generated. Optional parameter -disp for generating
stubs of dispatch interfaces.
Note that the parameters should appear in the command line in the
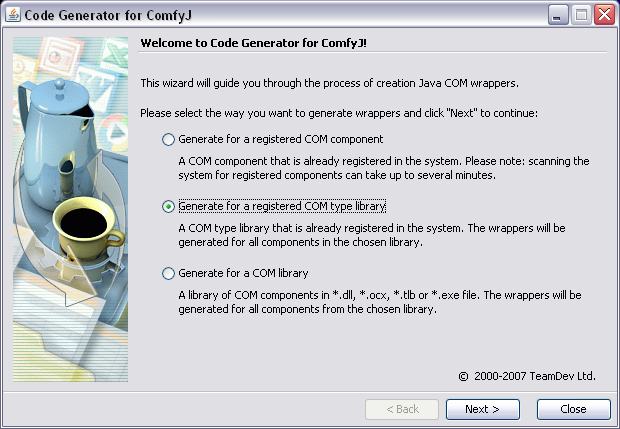
order listed above. Below are given command-line examples: CodegenForComfyJ.bat guid 00062FFF-0000-0000-C000-000000000046 9.2 src outlook CodegenForComfyJ.bat progid shell.explorer 1.1 src explorer -disp 5.1.1. Running Code Generator in GUI ModeApart from the command-line version, you can work with Code
Generator in GUI mode. To start a GUI-based program, run
CodegenForComfyJ.bat without any parameters. The
first wizard step will be as follows: Select, for example, the "Generate for a registered COM
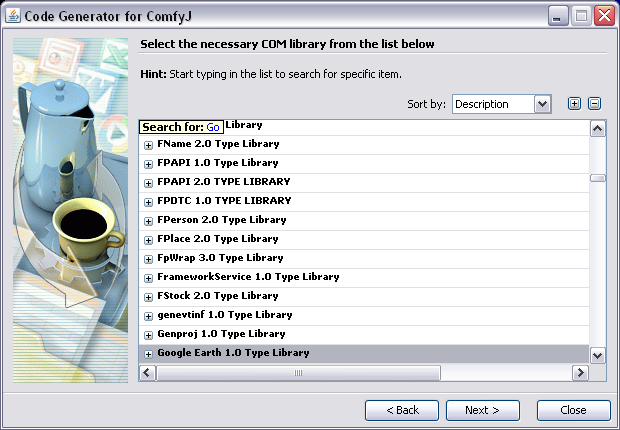
type library" option. At the next step, you need to select a COM
component: To quickly find a needed component, just place focus in the
list and start typing. Let's select Google Earth Type Library. At the
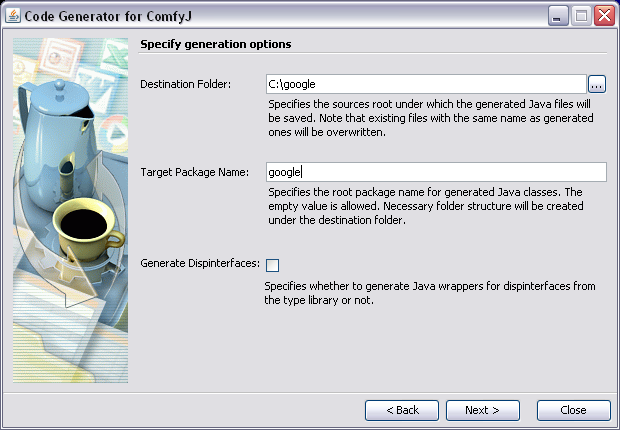
next step, you need to provide the wizard with additional information:
specify where to save the generated code, the package name that will
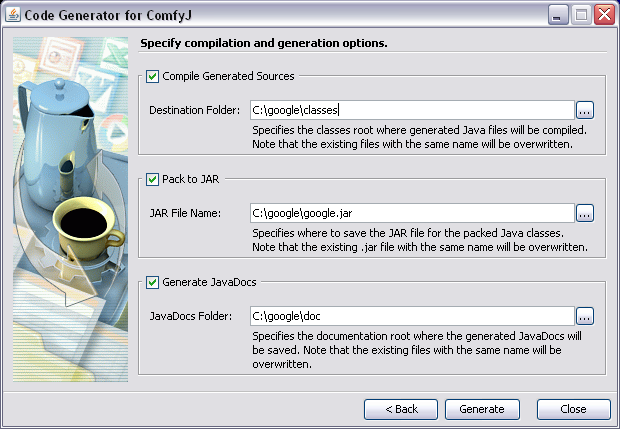
be used and whether to generate wrappers for disinterfaces: The last step allows you to select generation-related
options: That is all information required for code generation. Just
click the "Generate" button and in a few seconds, the stubs will be
created: 5.1.2. Detecting GUID, ProgID and VersionNormally, GUIDs are declared in documentation for COM objects.
If you don't have the GUID for the COM library, you may want to search
for it in Windows Registry under: HKEY_LOCAL_MACHINE\SOFTWARE\Classes\CLSID The type library can hold multiple versions of COM objects. Like
with GUID, consult the documentation for the correct version
number. 5.2. Namespaces and Package NamingThe destination root package passed to Code Generator in the
command line is actually the root for other subpackages automatically
generated by the application. The program generates a subpackage for
each namespace it detects in the specified type library. For example, if the type library defines two namespaces
outlook and office, you would have the
following package structure: mypackage
mypackage.outlook
mypackage.office If there are no namespaces defined in the type library, the code
will be generated under the passed package.  | In this document, the term root package
will be used to designate a package created for a namespace (if
defined), or the package specified in the command line if namespaces
are not used. |
5.3. Generated Code StructureThe Code Generator application produces the code described in the
following sections. 5.3.1. Structures, Unions, EnumerationsThese data type classes are created in the root package. 5.3.2. InterfacesInterfaces are created in the package root. The code for each
interface defines methods for corresponding COM interface and the
interface identifier. 5.3.3. Implementation ClassesThe Java code for each generated COM interface is accompanied by
the implementing classes. These classes serve as client-side code for
invoking methods of corresponding COM interfaces. These classes are
generated under the impl subpackage. Each implementation class contains a constructor that takes
IUnknown as a parameter. Using this
constructor, you can cast one interface to another if it is
implemented by the COM class you integrate with. This is similar to
calling the QueryInterface() COM
method. 5.3.4. CoClassesThe Microsoft COM documentation defines a class as "an
implementation that allows QueryInterface between a set of interfaces"
(see "Platform SDK: Microsoft Interface Definition Language
(MIDL)"). Code Generator creates classes derived from
com.jniwrapper.win32.com.CoClass for each
coclass found in the type library. Coclasses serve as a factory for
objects that implement default interfaces associated with the
coclass. Each CoClass provides methods with the following
signatures: public static DefInterface create(ClsCtx dwClsContext)
throws ComException;
public static DefInterface queryInterface(IUnknown unknown)
throws ComException;where DefInterface is the default
interface associated with the coclass. The create() method creates an object
implementing the default interface of the coclass. The parameter
passed to the method designates the execution context for the
class. The queryInterface() method allows to
get the default interface from the existing COM object passed as
IUnknown. 5.3.5. VTBL ClassesJNIWrapper provides the ability to expose a Java class as a COM
object, so it can be called by the native side of the integrated
application. VTBL classes provide callbacks for the native side code
exposing a Java class as a COM object. For more information on calling
Java from native side, please see the section "Exposing COM to Java". Chapter 6. COM to Java Integration
6.1. Developing Java COM ServersTo create your Java COM server means to develop your own Java
class that extends the com.jniwrapper.
win32.com.DispatchComServer class. This class should
implement at least one interface. You can access only the methods listed
in the interfaces the class implements as the COM server methods. So you
can implement any of the existing interfaces (like
IPersist) or develop your own one.
However, the current implementation of Java Com servers supports
only dispatch custom interfaces. This means that
you can interact with the Java COM object via custom interfaces using
the Automation technology only. | In the current version of ComfyJ, no properties of COM servers
are supported. |
6.1.1. Developing Java DispinterfaceWhen developing Java dispinterfaces, please pay attention to the
following: Custom interfaces should derive from the
com.jniwrapper.win32.automation.IDispatch
interface. The return values and arguments of the dispinterface methods
should be of JNIWrapper types (such as DoubleFloat or
BStr). Your Java interfaces will not be available as regular COM
interfaces.
The sample dispinterface is shown below: public interface ISample extends IDispatch
{
public BStr getProgId();
}For the full code sample, please see
ComToJava/src/ISample.java 6.1.2. Developing Java COM Server ClassA Java COM server class should implement all the interfaces you
want to provide in your COM server. When developing a Java COM server,
pay attention to the following: This class should declare
COM_SERVER_CLSID as the public
static final field that describes your COM server's
globally unique class identifier (CLSID). In the same way, it can
also declare PROG_ID,
VERSION_INDEPENDENT _PROG_ID and
COM_SERVER_DESCRIPTION, but only
CLSID is required. The return values and attributes of the methods should be of
JNIWrapper types (such as DoubleFloat or
BStr).
Here is the example of the COM server class: public class JavaComServerSample extends DispatchComServer implements IPersist, ISample
{
public static final CLSID COM_SERVER_CLSID =
new CLSID("{A35B432E-5274-4146-9858-638313EDCEA6}");
public static final String PROG_ID = "jniwrapper.comtojavasample.1";
public void getClassID(CLSID pClassID) throws ComException
{
pClassID.setData1(COM_SERVER_CLSID.getData1());
pClassID.setData2(COM_SERVER_CLSID.getData2());
pClassID.setData3(COM_SERVER_CLSID.getData3());
pClassID.setData4(COM_SERVER_CLSID.getData4());
}
public BStr getProgId()
{
return new BStr(PROG_ID);
}
}For the full code sample, see
ComToJava/src/JavaComServerSample.java 6.2. Registering Java COM ServersBefore the Java COM server can be used, it should be registered in
the Windows Registry. The necessary configuration can be done with the
help of ComfyJ ServerManager application or using ComfyJ API
directly. During the registration, paths to all the necessary Java libraries
are saved in the Windows Registry. Note that the Java COM server should
have access to all the ComfyJ necessary libraries and core files. For more information on the necessary libraries and files, please
refer to the section Configuring
Software. Also consider that the CLASSPATH can not be very long, so if you
want to add a huge number of JARs you shall use the following
workaround. You put a list of JARs separated by one or more spaces as a
value of the Class-Path attribute in the manifest file
(Manifest.mf). Then you put this file to the
META-INF folder at the root of any other JAR which
shall be added to the CLASSPATH of the server. Look at the following
code as an example of the manifest file. Note that jniwrap-3.0.jar,
comfyj-2.0.jar, winpack-3.0.jar and jniwraplib.jar are in the same
folder as the deafult.jar, which contains the following manifest file.
Manifest-Version: 1.0
Class-Path: jniwrap-3.0.jar comfyj-2.0.jar winpack-3.0.jar jniwraplib.jar
6.2.1. ComfyJ ServerManager: Registering in Command-Line ModeThe ServerManager application allows you to register the Java
COM server using the command line. If you run
ServerManager.bat with the "/?" or "-h"
paramater, you will see a quick guide to using the program in console
mode: Usage 1: Command line mode
Registering Java COM server
---------------------------------
Usage: ServerManager.bat serverClassName -classpath classpath [-jvm jvmPath]
serverClassName Java COM server class name.
classpath Classpath that will be used for running the server.
Make sure that classpath includes jniwrap.jar, comfyj.jar,
and winpack.jar libraries.
jvmPath Optional. Specifies the JVM (java.exe or javaw.exe) that
will be used for running the server. If it is not defined,
the default JVM will be used.
For example: ServerManager.bat com.project.MyServer
-classpath "c:/MyServer/jniwrap.jar;c:/MyServer/comfyj.jar;
c:/MyServer/winpack.jar;c:/MyServer/myserver.jar"
-jvm "c:\j2sdk1.4.2_06\bin\javaw.exe"
Unregistering Java COM server
---------------------------------
Usage: ServerManager.bat -unregister {serverClassName -classpath classpath
or -clsid clsid}
serverClassName Java COM server class name to be unregistered.
classpath Classpath of the server.
clsid Class ID (CLSID) of a Java COM server to be unregistered.
For example (by class): ServerManager.bat -unregister com.project.MyServer
-classpath "c:/MyServer/jniwrap.jar;c:/MyServer/comfyj.jar;
c:/MyServer/winpack.jar;c:/MyServer/myserver.jar"
For example (by clsid): ServerManager.bat -unregister
-clsid {A35B432E-5274-4146-9858-638313EDCEA6}
Usage 2: To run ServerManager GUI, start without parameters.If you want to register the Java COM server, make sure to
specify the fully qualified class name and the classpath to be used
for running this server. Note that the classpath should include at
least the jniwrap.jar,
comfyj.jar and winpack.jar
libraries and the library that contains the specified COM
server. The ServerManager application allows you to unregister the
server by its class name or by its globally unique class identifier
(CLSID). If you unregister the COM server by its class name, you need
to specify the full classpath of the server too (the
-classpath parameter). Unregistering the COM
server by CLSID doesn't require any additional information. 6.2.2. ComfyJ ServerManager: Registering in GUI ModeStart the ServerManager application using the
bin/ServerManager.bat file from the ComfyJ
distribution. When the application is opened, follow these
steps: In the upper part of the window, click the Load
From button to load Java COM servers from a JAR
library or directory. All COM servers from the specified path are displayed in
Server List. If the selected server is
registered, its details appear read-only; otherwise you can edit
the server's startup parameters on the right. In the CLASSPATH area, click the
Add JAR/Directory button to add necessary
libraries and directories that are specific to this server
only. In the CLASSPATH area, click the
Add from Common button to add necessary
libraries and directories from the list of common libraries. These
can be at least jniwrap.jar, winpack.jar and
comfyj.jar libraries. The dialog box that
appears allows editing the list of common libraries. This list
will be saved to the manager.properties file
in the working directory of the ServerManager application. Select the server you want to register and click the
Register button.
Also, you can remove the Java COM Server from the Windows
Registry by selecting the appropriate server from the list and
clicking the Unregister button. If you need to list all Java COM servers registered in the
system, click the List Registered
button. 6.2.3. Registering at Run TimeYou can also register the Java COM Server object at run time of
the program using the registerComServer()
method and the
com.jniwrapper.win32.tools.RegisterDispatchComServer.ComServerDescriptor
class. In this case, you need to create an instance of the
ComServerDescriptor class and pass it to the
registerComServer() method. Take a look at the following code as the example of the run-time
component registration and its further usage: public class RuntimeRegistrationSample
{
public static void main(String[] args) throws Exception
{
String classPath =
"C:\\JavaComServer\\comfyj.jar;" +
"C:\\JavaComServer\\jniwrap.jar;" +
"C:\\JavaComServer\\winpack.jar;" +
"C:\\JavaComServer\\classes";
RegisterDispatchComServer.ComServerDescriptor descriptor =
new RegisterDispatchComServer.ComServerDescriptor
(JavaComServerSample.class, "C:\\JavaComServer\\classes",
System.getProperty("jvm.path"), classPath, null, false);
RegisterDispatchComServer.registerComServer(descriptor);
Runnable runnable = new Runnable()
{
public void run()
{
IDispatch dispatch =
new IDispatchImpl(CLSID.createFromProgID
("jniwrapper.comtojavasample"), ClsCtx.LOCAL_SERVER);
IPersistImpl p = new IPersistImpl(dispatch);
CLSID clsid = new CLSID();
p.getClassID(clsid);
System.out.println("ClassID = " + clsid);
}
};
OleMessageLoop.invokeAndWait(runnable);
OleMessageLoop.stop();
}
} 6.3. Using Java COM ServersYou can use the Java COM Servers as usual native COM servers.
Let's consider the usage of the previous sample COM server in different
programming languages. 6.3.1. Java ClientIf you want to use the Java COM server via a standard interface
(like IPersist), you can access its
methods by creating the appropriate implementing object (like
IPersistImpl, see the sample code below) and
calling its methods. To interact with the Java COM sever via a custom interface, you
need to use the
com.jniwrapper.win32.automation.Automation
class. In this case, the arguments of all the custom interface's
methods and their return values are of the automation-specific types,
so you need to wrap all the values into
com.jniwrapper.win32.
automation.types.Variants. public class JavaComClientSample
{
public static void main(String[] args) throws Exception
{
Runnable runnable = new Runnable()
{
public void run()
{
IDispatch dispatch =
new IDispatchImpl(CLSID.createFromProgID("jniwrapper.comtojavasample"),
ClsCtx.LOCAL_SERVER);
IPersistImpl p = new IPersistImpl(dispatch);
CLSID clsid = new CLSID();
p.getClassID(clsid);
System.out.println("ClassID = " + clsid);
Variant result = new Variant();
Automation automation = new Automation(dispatch);
result = automation.invoke("getProgId");
System.out.println("PROG_ID = " + result.getValue());
}
};
OleMessageLoop.invokeAndWait(runnable);
OleMessageLoop.stop();
}
}For the full code sample, please see
ComToJava/src/JavaComClientSample.java 6.3.2. C++ ClientYou can use the CoCreateInstance
function to create an instance of the COM server via its CLSID. If you
are going to interact with the Java COM server via a standard
interface, specify its IID in the
CoCreateInstance function call; otherwise you
should specify the IID_Dispatch constant. As a
result, you will be able to work with the created object via the
specified interface. To call methods from custom interfaces, you need to call the
IDispatch.Invoke() method. The first
parameter for the Invoke() method is
dispid of the called function that was obtained
using the GetIDsOfNames() method. Here is an
extract from the sample: int _tmain(int argc, _TCHAR* argv[])
{
using namespace std;
HRESULT hr;
//Initialize COM.
CoInitialize(NULL );
LPCOLESTR progID = OLESTR("jniwrapper.comtojavasample");
LPCLSID clsID = new CLSID;
CLSIDFromProgID(progID , clsID);
//Working with Java COM Server via the IPersist interface
IPersist* iPersistInst;
hr = CoCreateInstance(*clsID,
NULL,
CLSCTX_LOCAL_SERVER,
IID_IPersist,
(void **)&iPersistInst);
CLSID resultClsID;
iPersistInst->GetClassID(&resultClsID);
LPOLESTR stringClsID;
hr = StringFromCLSID(resultClsID , &stringClsID);
wprintf(L"GetClassID = %s%s", (wchar_t*)stringClsID, "\n");
//Working with Java COM Server via the IDispatch interface
IDispatch* iDispatchInst;
hr = CoCreateInstance(*clsID,
NULL,
CLSCTX_LOCAL_SERVER,
IID_IDispatch,
(void **)&iDispatchInst);
DISPID dispid;
VARIANT result;
OLECHAR* funcName;
DISPPARAMS dispparamsNoArgs = {NULL, NULL, 0, 0,};
//Calling the "getProgID" method
funcName = L"getProgId";
iDispatchInst->GetIDsOfNames(IID_NULL,&funcName,1,GetUserDefaultLCID(),&dispid);
iDispatchInst->Invoke(dispid,
IID_NULL,
GetUserDefaultLCID(),
DISPATCH_METHOD,
&dispparamsNoArgs,
&result,
NULL,
NULL);
wprintf(L"ProgID = %s%s", (wchar_t*)result.bstrVal, "\n");
// Free COM resources
CoUninitialize();
}For the full code sample, please see
ComToJava/native/CppSample.cpp 6.3.3. Visual Basic ClientThe Visual Basic language uses Automation technology to create
the COM server object by default. So you just need to create an
Object variable and use the
CreateObject function with
PROG_ID or CLSID as its
parameter to return the COM server object instance. As a result, you
will be able to call the object's methods declared in your custom
interface. In the following example, JavaServer
is a COM server and we're calling its getClassID
and getProgId methods. Public Class Sample
<STAThread()> _
Public Shared Sub Main()
'Creating Java Com Server object by its ProgID
Dim JavaServer As Object
JavaServer = CreateObject("jniwrapper.comtojavasample")
'Calling the server's methods
Dim myClsID As Guid
JavaServer.getClassID(myClsID)
Console.WriteLine("ClassID = {" + myClsID.ToString + "}")
Console.WriteLine("ProgID = " + JavaServer.getProgId)
End Sub 'Main
End ClassFor the full code sample, please see
ComToJava/native/VBSample Chapter 7. Using ComfyJ in Java Web Start Applications
This section describes the way of deploying your application that
uses ComfyJ with the help of Java Web Start (JWS). To deploy your application with the help of JWS, please follow the
next simple steps: Pack application classes to JAR file(s); Put license files for ComfyJ to the META-INF folder of an
application JAR file; Sign the application JAR files.
One of the major requirements for any JWS application is that all
its JAR files must be signed. Even though a JAR files can be signed
multiple times, JWS does not accept JAR files which have more than one
signature. It is also mandatory that all application JAR files are signed
with the same signature. To include the ComfyJ license files and sign JWS application you can
use the following ant template: <project name="Sample" default="build" basedir=".">
<target name="signjar">
<property name="applicatonJarName" value="demo.jar"/>
<jar destfile="${applicatonJarName }">
<metainf dir="${licensesPath}" includes="*.lic"/>
</jar>
<signjar jar="${licensesjarName}" alias="alias" keystore="keystore" keypass=" keypass" storepass=" storepass"/>
</target>
</project>Where: alias, keystore,
keypass, storepass are
parameters for signjar ant target. You can see more details about using of
signjar in the Apache Ant User Manual that can be found here: http://ant.apache.org/manual/CoreTasks/signjar.html All ComfyJ libraries are already signed with TeamDev's certificate
and signing them with a new signature makes them unacceptable for JWS.
Fortunately, there is a simple solution. The main idea is to use the
<extension> tag in the .jnlp file and to create
two different .jnlp files for your application. One
.jnlp file should contain your application files and
the other - ComfyJ resources. This technique is demonstrated in the
example below. The first file is the application
.jnlp file (demo.jnlp): <?xml version="1.0" encoding="utf-8"?>
<jnlp spec="1.0+" codebase="http://www.teamdev.com/" href="demo.jnlp">
<information>
<title>ComfyJ Demo</title>
<vendor>TeamDev Ltd.</vendor>
<description>ComfyJ Demo</description>
<description kind="short">The demo of ComfyJ library</description>
<offline-allowed/>
</information>
<security>
<all-permissions/>
</security>
<resources>
<j2se version="1.4+" initial-heap-size="64m"/>
<property name="sun.java2d.noddraw" value="true"/>
<property name="javax.swing.adjustPopupLocationToFit" value="false"/>
<jar href="demo.jar"/><!-- demo.jar is your jar file signed with your own signature-->
<extension name="cmfj" href="cmfj.jnlp"/>
</resources>
<component-desc/>
<application-desc main-class=" com.jniwrapper.win32.samples.demo.ComfyjDemo"/>
</jnlp>The <extension> tag above makes the reference to the other
cmfj.jnlp file which is declared in the following
way: <?xml version="1.0" encoding="utf-8"?>
<jnlp spec="1.0+" codebase="http://www.teamdev.com/" href="cmfj.jnlp">
<information>
<title>ComfyJ resources</title>
<vendor>TeamDev Ltd.</vendor>
<description>ComfyJ Library Resources</description>
<description kind="short">ComfyJ Library Resources</description>
<offline-allowed/>
</information>
<security>
<all-permissions/>
</security>
<resources os="Windows">
<nativelib href="jniwraplib.jar"/>
</resources>
<resources>
<jar href="jniwrap.jar"/>
<jar href="winpack.jar"/>
<jar href="comfyj.jar"/>
</resources>
<component-desc/>
</jnlp>The second cmfj.jnlp file represents the ComfyJ
resources bundle for redistribution as part of another JWS application.
The jniwraplib.jar package should only include one
file: jniwrap.dll. After you have configured the .jnlp files,
place them to your Web site and create a link to your main
.jnlp file that will also download ComfyJ resources
by the reference. Chapter 8. ComfyJ Samples
The ComfyJ distribution includes a number of samples that
demonstrate different aspects of ComfyJ functionality. Among them are
samples showing how to embed and interact with popular ActiveX controls
such as Microsoft Office applications, Acrobat Reader, Macromedia Flash
Player, QuickTime and others. Please use the ComfyJDemo application to see
all these samples in action. Some of the samples require generated stubs. You can generate stubs
using the Code Generator application. Follow these steps after launching
the 'Code Generator for ComfyJ' application to generate the stubs: Select the Generate for a registered COM type library from the
list. Select the necessary COM type library by its Description or
GUID, which can be found in the java docs of the sample class. For
example, if you want to try the WordIntegrationSample, you will need
to choose the Microsoft Word 11.0 Object Library. Fill the Destination Folder field with any folder you wish to.
Fill the Target Package Name field with the package name from the 'In
the package:' line of the sample java docs. For example, if you want
to try the WordIntegrationSample, you will need to fill it with
word. Link up the generated sources to your project.
Chapter 9. Support
If you have any problems or questions regarding ComfyJ, please check
the documents listed below. The answer to your question may already be
there: If none of the above resources contain the required information,
please e-mail us at: comfyj-support@teamdev.com
9.2. Reporting ProblemsIf you find any bugs in ComfyJ, please submit the issue to us
using a special report form on the TeamDev integrated customer support
and troubleshooting center at: http://www.support.teamdev.com/
The form will help you provide all necessary information. |
 | Copyright © 2002-2020 TeamDev Ltd. | |
|
|